Showing posts with label chocolate. Show all posts

Tuesday, May 3, 2016

Chocolate Pie


I am posting this cake to celebrate that I am starting up my blog again. As you can probably see, I haven't posted for a very long time. I have been very busy this past year, since I just moved back to the Netherlands and have been trying to settle into my new home and my new school. Now, I am finally ready to start posting delicious chocolate recipes on my blog again. 

This pie looks more complicated than it actually is, since you only need to bake the crust. You don't have to add the white chocolate decoration, but I thought it made the cake look more finished. 

Serves 8-10
Action Time: 35 minutes + 20 minutes oven time + 2 hours cooling
For the tart shell:
8 oz/225 g all-purpose flour
1 tbsp fine sugar
1 stick/8 tbsp/115 g cold unsalted butter, diced
1 egg yolk, lightly beaten
For the filling:
8.5 fl oz/250 ml heavy cream
10.5 oz/300 g dark chocolate (min 70%), chopped
5 tbsp/75 g unsalted butter, diced
3 tbsp fine sugar
1.5 fl oz/45 ml milk
1 tsp vanilla extract or the zest of ½ small organic orange
1.5 oz/45 g white chocolate, chopped
Extra: food processor (optional), cling film, greased about 9.5 inch/24 cm tart pan with a removable bottom, parchment paper, pie weights or dried beans, decoration pen for chocolate
1. For the tart shell, put flour, sugar, and a pinch of salt in a bowl. Then rub in the butter until the mixture resembles fine breadcrumbs (or use a food processor). Add the egg yolk and 1-2 tbsp cold water and knead briefly until the dough comes together. Gather the ball into a thick ‘sausage’, wrap in cling film and refrigerate for about 30 minutes.
2. Preheat the oven to 350F/175C. Cut the dough sausage into 1/8 inch (3-4 mm) thick slices. Place the slices in and around the bottom and sides of the tart pan; push and press them together with your fingers until the whole pan is covered. Line the dough with parchment paper and fill with the pie weights or dried beans. Bake for 15 minutes in the oven, remove parchment paper en pie weights and bake for about 5 minutes more or until de crust is golden but not too brown; gently pierce with a fork if the bottom starts to puff up. Remove from the oven and cool on a wire rack.
3. To make the filling, heat the cream in a heavy bottomed saucepan until it just starts to boil. Remove from the heat, add the chocolate, butter, sugar, and a pinch of salt and whisk until melted and well incorporated. Slowly add the milk and stir until completely blended and until the mixture is soft and shiny. Mix in the vanilla or orange zest. Pour the filling with care into the tart shell.
4. Melt the white chocolate in a double boiler (or use the microwave). Fill the decorating pen with the white chocolate and make a white chocolate spiral on top of the chocolate filling. Use a skewer to create a flower figure on top of the filling. Divide the circles created on the filling in eight segments by drawing lines with the skewer; alternating the direction of the lines. (See first picture).
5. Let cool completely until set (this will take about 2 hours). If the filling doesn’t set fast enough you can put the tart in the fridge, but remove it 30 minutes before serving. Cut it into wedges and enjoy!

Tuesday, August 19, 2014

Mexican Chocolate Pops


I once had Mexican Chocolate Pops in San Francisco and they were AMAZING!!! For the summer and the hot weather, I decided to make some of my own. It's very easy to make. All you need is a popsicle mold (we ordered one online). I'm a fan of dark chocolate and I don't like to have things too sweet. I know that's not very common for someone my age, so if you wish you can add more tbs of sugar than I did.


You will need:


1/2 cup/125 ml heavy cream

2.5 cups/600 ml milk
1 tsp cinnamon
2 tbs cacao
3-5 tbs sugar
3.5 oz/100 g dark chocolate (70%), chopped

Extra: popsicle mold (plus sticks)


1. In a small saucepan, mix the heavy cream, milk, cinnamon, cacao, and sugar. Bring to a simmer and stir until everything is well mixed and dissolved. Lower the heat and add the chopped chocolate. Stir until chocolate has melted. Remove the pan from the heat and let cool a little.


2. Pour the mixture into the molds. Leave a little space at the top, about 1/4 inch (1/2 cm). Put the lid on the popsicle mold. Put in the freezer. If using a mold with separate sticks, freeze until the mixture is slushy and then put the sticks in.


3. Freeze for at least 5 hours or until the pops are solid.


4. To unfold the pops, briefly dip the molds in warm water so that the pops are easy to take out of the molds. Enjoy your summer!


Chocolate-Covered Popcorn


It's summer and I finally had the time to make something for my blog again! These Chocolate-Covered Popcorn Rocks are a delicious summer treat and great for sleepovers. They are also very easy to make. For this recipe, I used dark chocolate, but I bet they are also delicious with milk chocolate. If you're not going to eat the Chocolate Popcorn right away, you can put them in the fridge so that the chocolate doesn't melt. I hope you like them!


You will need: 

2 tbsp canola oil
1/3 cup of popcorn kernels
3.5 oz/100 g dark or milk chocolate, broken into pieces

Optional: a pinch of salt

Extra: (popcorn) pan, a small baking sheet lined with parchment or waxed paper


1. Heat the oil in a popcorn pan or deep pan over high heat. Add the popcorn kernel, cover the pan and stir (or shake if you are using a deep pan) to make sure the kernels don't burn. Cook until the popping stops. Sprinkle some some salt over the popcorn, if using.


2. Melt the chocolate in a bowl that can be heated (or use a double boiler). Put the bowl on a pan with boiling water in it. make sure the water doesn't touch the bowl. Melt the chocolate slowly on a low temperature. Stir from time to time. 


3. Throw a small handful of the popcorn into the melted chocolate, stir carefully until most of the popcorn is covered with chocolate. With a spoon, scoop small heaps of the chocolate covered popcorn onto the prepared baking sheet. Repeat until all the chocolate has been used (you might still have some popcorn left).


4. Transfer to the fridge and let the chocolate set. Keep in the fridge until using. Enjoy!!!

Thursday, February 13, 2014

Valentine Chocolates


It's almost Valentine's Day!!! My friends invited me over for a sleepover tomorrow night, so I decided it would be fun to make these Valentine Chocolates to get in the mood. They're fun and easy to make, but you do need chocolate molds, which you can buy at a store that sells cookware. We always go to Sur La Table. My sister gave me these molds last Christmas. I haven't used them yet, so I thought it would be fun to create a recipe with them for my blog.


You will need:

7 oz/ 200 g good quality dark, milk, or white chocolate, broken into pieces

Optional: orange zest or finely chopped nuts

Extra: chocolate molds

Note: Dark chocolate is the easiest chocolate to work with, because it melts better than milk or white chocolate. Don't' let your chocolate get too hot, and make sure that no water comes in contact with the chocolate while melting it.


1. You will need chocolate molds like these. Put them on a flat surface.


2. Melt the chocolate in a bowl that can be heated (or use a double boiler). Put the bowl on a pan with boiling water in it. make sure the water doesn't touch the bowl. Melt the chocolate slowly on a low temperature. Stir from time to time. 


3. Pour the melted chocolate into the molds. 


4. If you want, you can sprinkle some orange zest or chopped nuts over the back of the chocolates. Put the molds in the fridge and wait for about 30 minutes until the chocolate is set. Tap or push the chocolates out of the molds. Eat them immediately or keep them in the molds in the fridge until needed.


Happy Valentine's Day!!!


Wednesday, December 4, 2013

Dutch Chocolate Covered 'Kruidnoten'

On the 5th of December The Netherlands celebrates Saint Nicolas Day. It's one of the most important holidays of the year. Saint Nicolas, like Santa, bring presents for children and adults. On this very traditional holiday we eat lots of very traditional sweets. One of my favorite sweets are these kruidnoten. 'Kruid' means spices, and 'noten' means nuts. They are tiny nut-like cookies made with spices and brown sugar. It's very nice to cover them in chocolate, so that's what I did. It's a yummy, chocolaty seasonal treat.


For about 100 kruidnoten, you will need:
125 g/4.5 oz unsalted butter, 250 g/9 oz flour, 2 tsp baking powder, 125 g/4.5 oz dark brown sugar, 2 tbs pumpkin pie spices (to make your own, see below), 2-3 tbs milk, 100 g/3.5 oz dark chocolate

Note: If you don't like dark chocolate you can use milk chocolate instead.

Of course, you can always buy pumpkin pie spices (speculaaskruiden in Dutch) from the store, but I decided to make my own. All you need is:

2 tsp cinnamon, 2 tsp ginger, 1/2 tsp cardamom, 1/2 tsp nutmeg, 1 tsp cloves powder


1. If you are making your own pumpkin pie spices, just combine all the spices in a bowl.


2. Cut the butter in pieces. Combine flour, baking powder, sugar, spices, and a pinch of salt in a bowl. Add the butter, and rub it with the tips of your fingers until it looks like fine bread crumbs.


3. Add the milk and kneed the dough until it becomes a ball. Wrap it in cling film and let it rest for 1 hr. in the fridge.


4. Preheat the oven to 350F/175C. Roll the dough into about 100 very little balls of approximately 1/2 inch (1,5 cm).


5. Put the kruidnoten on a baking sheet covered with parchment paper. Bake them in batches for 12-13 minutes. Take them out of the oven and let them cool completely. Now you can finally cover them with chocolate!!!


6. Break the chocolate in pieces and put them in a bowl that can be heated (or use a Bain-Marie pan, like we did). Put the bowl on a pan with boiling water in it. Make sure the water doesn't touch the bowl. Melt the chocolate slowly on a low temperature. Stir from time to time. Dip about 5 kruidnoten in the chocolate at a time. Take them out with a fork and put them on a board covered with parchment paper. You do not have to cover all of the kruidnoten, but you can if you want to.


7. Put the kruidnoten in the fridge until they are set. 


These kruidnoten taste delicious with hot chocolate!!!

Thursday, November 14, 2013

Gluten Free Chocolate Almond Thumprint Cookies

Last Friday I wanted to bake chocolate cookies after school. We were out of butter, so I couldn't bake cookies that would contain butter. I talked it over with my mom and then we came up with these chewy thumbprint cookies, which are made with ground almonds and egg white instead of flour and butter. They turned out more than delicious, and they are so easy to make! I'm definitely going to make them more often.


Makes 24 cookies

7 oz/200 g sugar, 7 oz/200 g ground almonds, 4 tbsp cocoa powder (plus extra for dusting), 2 egg whites, apricot jam (for the filling)


Extra: 2 cookie sheets, parchment paper


1 Preheat the oven to 350F/175C. Line 2 cookie sheets with parchment paper. Mix the sugar, ground almonds and cocoa in a bowl. Add the egg whites and mix until you have a sticky dough.


2 Divide the dough into 24 tiny balls and place them about 2 inches (5 cm) apart on the cookie sheets.


3 Wet your thump and press a well into the center of each cookie.


4 Fill each cookie with about 1/2 a teaspoon of jam.  Bake the cookies 12-13 minutes in the oven, rotating the sheets about halfway through baking.


5 Let stand for 5 minutes and transfer to a wire rack. The cookies firm up as they cool. Dust lightly with cocoa before serving.

Saturday, October 26, 2013

Seasonal Brownies with Amarena Cherries

This is the first time I post brownies on my blog. I loooove brownies, so yesterday I decided to bake some after school. I used one of my mom's old recipes, but gave it a little twist here and there. We have a jar with Amarena cherries, these are little Italian cherries in syrup. They taste a little like the cherry candy but of course are much better. I scattered some cherries over the dough before baking, and when the brownies had cooled I sprinkled some cinnamon on top. This really gives them a seasonal taste that I like very much.


Makes 12 brownies


150 g dark chocolate (70%), 150 g unsalted butter, 3 eggs, 100 g all purpose flour, 1 tsp baking powder, 4 tbs cocoa, 175 g sugar, 20 amarena cherries, cinnamon


Extra: brownie baking pan (about 20 x 20 cm/ 8 x 8 inch), greased and lined with parchment paper


1. Preheat the oven to 175 C (350 F). Break the chocolate into pieces, and cut the butter. Put the chocolate and butter in a bowl that can be heated (or use a Bain-Marie pan, like we did). Put the bowl on a pan with boiling water in it, make sure the water doesn't touch the bowl. Melt the chocolate slowly at a low temperature, stir from time to time. As soon as the chocolate and butter have melted, remove the bowl from the pan with water. 


2. Whisk the eggs until fluffy and pale yellow. While whisking add the flour, baking powder, cocoa an sugar. 


3. Fold the melted chocolate into the egg mixture.


4. Pour the batter into the prepared pan and top with the amarena cherries. 


5. Bake the brownie about 20 minutes on the center rack of the oven. Important: You don't want to overcook the brownie, so don't bake it too long (when you stick a skewer inside the brownie it must not come out completely clean, but not dirty either). 


6. Let cool completely then remove from the pan. Cut the brownie into 12 pieces and dust lightly with cinnamon (the best way to do this is with a little tea sieve). You can keep the brownies in an airtight container for up to 4 days! 


Sunday, September 29, 2013

Dark Chocolate Fresh Fig Bonbons

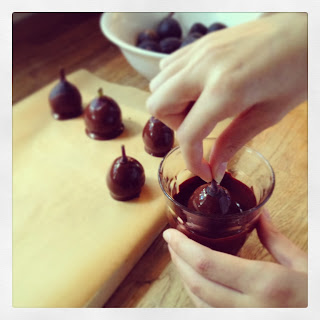
It's fig time! When we walked our neighbor's dog last week, we passed a huge fig tree with lots of ripe figs. My mother decided to pick a few and on our way home we invented these fresh fig bonbons. They are very easy to make and taste delicious. Be sure to use only very sweet and ripe figs. If you cannot find these, you can always make the bonbons with dried figs.


You'll need: appr. 15 ripe figs, 100 g (3.5 oz) dark chocolate (70%)

Extra: parchment paper


1. Break the chocolate in pieces and put them in a bowl that can be heated (or use a Bain-Marie pan, like we did). Put the bowl on a pan with boiling water in it. Make sure the water doesn't touch the bowl. Melt the chocolate slowly on a low temperature. Stir from time to time.


2. Pour the melted chocolate into a little glass. Preheat the glass by holding it briefly under warm runnning tap water, this prevents the chocolate of getting cold immediately.  


3. While holding the figs by the stems, dip them into the melted chocolate. Set them on a board covered with parchment paper.


4. Put the figs in the fridge until they are set.


5. Wrap a piece of ribbon around the stems of the figs if you like, and put them in a little box. They'll make a nice present.  


Enjoy your chocolate covered figs!!!